In today’s fast-paced digital world, high-quality product photography has become essential for businesses of all sizes. Whether you’re an entrepreneur looking to sell online or a hobbyist seeking to showcase your creations, product photography studio setup is highly essential for you. It can significantly enhance the visual appeal of your offerings.
But many people believe that establishing a professional-looking photo studio requires a substantial financial investment. The good news is that you can create an effective product photo studio on a budget without compromising on quality.
In this comprehensive guide, we will walk you through the step-by-step process of setting up your own product photo studio on a limited budget. From choosing the right equipment to optimizing your shooting environment, we will provide you with practical tips and cost-effective solutions, allowing you to achieve impressive results without breaking the bank.
You don’t need to be a professional photographer or have fancy equipment to create captivating product images. With a few creative ideas and some careful planning, you can transform a small corner of your home or office into a versatile and efficient photo studio.
Studio Setup for Product Photography: Step-By-Step
Here is the step-by-step guide to setting up a product photography studio on a budget below.
- Choosing a Location
- Collecting Essential Equipment
- Arranging Your Space
- Setting Up Your Lighting
- Stabilizing & Testing Your Camera
Choosing A Location For Your Product Photo Studio
When selecting a location for your product photo studio, cleanliness plays a vital role in creating professional-looking images. Opt for a space that is clean and free from dust or any potential distractions that could affect the quality of your photos. A clutter-free environment allows your products to take centre stage, capturing the attention of your audience. Additionally, simplicity is key when it comes to the background. Look for a location with a neutral backdrop or the ability to create one easily. This allows your products to stand out and ensures that the focus remains on them, rather than a busy or distracting environment.
Size
The size of your chosen location is an important aspect to consider. It should provide enough space to accommodate your product, lighting equipment, and any props or accessories required for your shoot. If your products are small, you may only need a small corner or tabletop setup. However, larger items may require more room to allow for different angles and compositions. Assess the dimensions of your products and plan accordingly, ensuring that the photo studio location offers enough space for your specific needs.
Cleanliness
Selecting a clean and well-maintained location is crucial when setting up your product photo studio. A clean environment ensures that your product images look professional and free from any unwanted distractions. Dust, dirt, or clutter can negatively impact the overall quality of your photos. Choose a space that is regularly cleaned and free from debris, ensuring that your products remain the sole focal point in the images.
Studio Lighting
Proper lighting plays a significant role in capturing high-quality product photos. When choosing a location, consider the availability of natural light sources or the ability to set up artificial lighting. Natural light can be ideal for achieving soft and even illumination, especially if you have access to large windows. If natural light is limited, invest in studio lights or affordable lighting equipment that can help you achieve consistent and well-controlled lighting conditions for your product photography.
Accessibility & Availability
The accessibility and availability of your chosen location are also important factors to consider. Select a space that is easily accessible for you to set up and manage your photo shoots with convenience. If it’s a shared space, make sure you have the necessary permissions and availability to use it when needed. Additionally, consider the availability of your chosen location, especially if it’s a rented or shared space. Ensure that you have the flexibility and availability to utilize the space as needed for your product photography sessions.
Simplicity
Simplicity is key when it comes to the background of your product photos. Look for a location that offers a neutral backdrop or the ability to easily create one. Busy patterns or intricate designs can detract attention away from your products. A simple and minimalistic setting allows your items to take center stage, making it easier for potential customers to focus on them. Opt for plain walls or consider backdrop options such as seamless paper or fabric that can be easily adjusted to complement your products.
Selecting the right location for your product photo studio is crucial to the success of your business.
Collecting Essential Equipment for Product Photo Studio
When setting up your product photo studio, you’ll need certain equipment to ensure professional and high-quality results. Here’s a breakdown of the equipment you’ll need and whether to save or splurge on them:
Camera:
Depending on your budget and requirements, you can spend anywhere from nothing (if you use a smartphone with a good camera) to thousands of dollars on a professional-grade camera. Assess your needs, considering factors such as image quality and control, to determine the appropriate investment.
Tripod:
A tripod is essential to achieve stability and eliminate camera shake. You can find tripods with varying prices, starting from around $50 or more. Consider your shooting style and the weight of your camera to choose a tripod that suits your needs. It’s worth investing in a durable and adjustable tripod.
White Backdrop:
A white backdrop serves as a versatile and clean canvas for product photography. While you can purchase professional-grade backdrops for higher prices, you can also find affordable options for $10 or more. Look for materials like white paper rolls or fabric that can be easily set up and replaced as needed.
White Bounce Boards:
Bounce boards help control lighting and reduce shadows. You can save money by using foam boards or white cardboard, which are inexpensive and readily available. These can be found for around $10 or more, depending on the size and quantity needed.
Table And Props:
When it comes to tables and props, you can save money by repurposing items you already have at home or purchasing affordable options from thrift stores or local marketplaces. Get creative and think outside the box to find suitable surfaces and attractive props that enhance your product’s visual appeal.
Small Toolbox:
A small toolbox is handy for organizing and storing essential photography accessories, such as spare batteries, memory cards, and lens cleaning tools. You can find budget-friendly toolboxes for around $30. Consider investing in a compact and durable one to keep your equipment well-organized and protected.
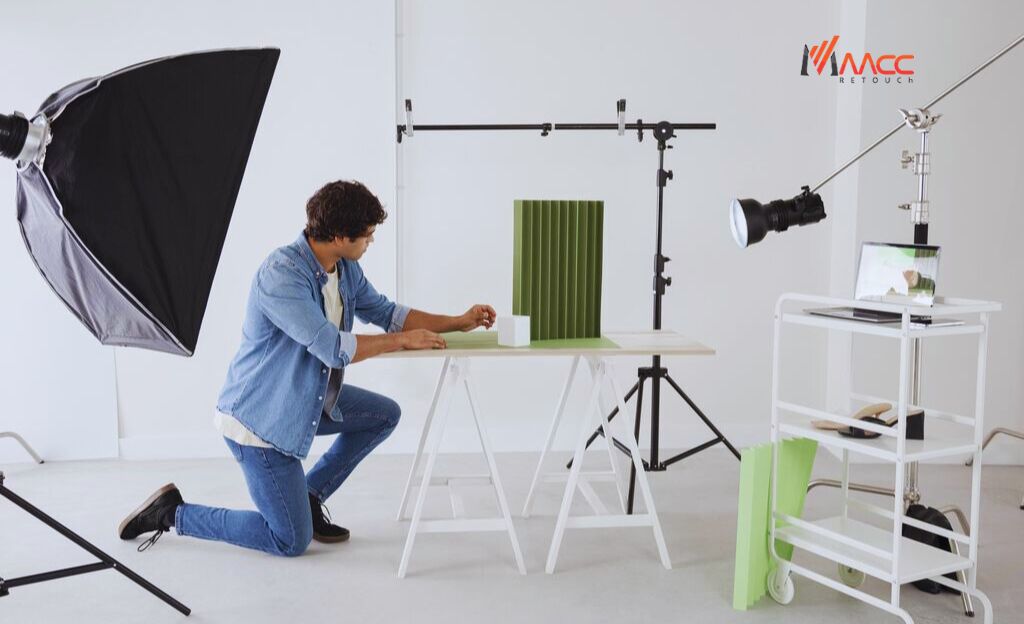
Arranging Your Space With Table Top & Props

To set up your product photography studio, follow these steps to arrange your tabletop and props:
Clear & Clean The Tabletop Surface:
Start by clearing the tabletop surface of any unnecessary items or dust. Ensure that the surface is clean and free from debris to create a professional setting for your product photos.
Determine The Size & Type Of Tabletop Needed:
Consider the size and nature of your products to determine the appropriate tabletop size and material. A flat and sturdy surface such as a table or a dedicated photography table works well. It should be large enough to accommodate your products and allow room for positioning them at various angles.
Position The Tabletop & Set Up A Backdrop:
Place the tabletop in your desired location within the studio. If using a simple backdrop, attach a white or neutral-coloured background to the wall or hang a large sheet of backdrop paper. Ensure it is seamless and wrinkle-free to achieve a clean and professional look.
Arrange The Props:
Select props that complement your products and enhance their visuals. Consider the style and theme you want to convey and choose props accordingly. For example, if you’re photographing jewelry, you might use jewelry stands, decorative trays, or textured fabrics. Experiment with different combinations to find the most appealing setup that highlights your products.
Create Depth & Layers:
Place props at varying distances from the camera to create depth and visual interest. Use props of different sizes, heights, and textures to add layers to your composition. This helps to generate a sense of depth and perspective, making your product photos more visually engaging.
Pay Attention To Spacing & Arrangement:
Arrange the props in a way that complements and highlights your product without overwhelming it. Leave enough space to keep the focus on the main subject. Consider the rule of thirds, which involves dividing the frame into thirds both horizontally and vertically, and position your products and props accordingly.
Experiment With Angles & Compositions:
Play around with different camera angles and compositions to capture your products from various perspectives. Try shooting from above, at eye level, or from a unique angle to showcase different features and details. Don’t be afraid to take multiple shots and adjust the arrangements to find the most visually appealing result.
Remember, the arrangement of your tabletop and props should support and showcase your products effectively. Be mindful of visual balance, aesthetics, and how the props enhance the overall composition without detracting from the main focus – your products.
Set Up Your Light Source: Natural Vs. Artificial
When setting up your product photography studio, you have the option to choose between natural light and artificial lighting for your light source. Here’s how to set up each:
Natural Light:

Locate A Window Or Area with Ample Natural Light: Position your tabletop setup near a window or in a well-lit area where natural light is abundant. North-facing windows often provide soft, diffused light, while south-facing windows offer brighter and more direct light. Assess the quality and direction of light throughout the day to find the best spot.
Diffuse Harsh Sunlight: If the natural light is too bright or harsh, consider diffusing it to create a softer lighting effect. You can do this by hanging sheer curtains, using a diffusion panel, or applying a sheer fabric over the window. This helps to create even, diffused lighting on your subject.
Utilize Reflectors Or Bounce Boards: Enhance natural light by using reflectors or bounce boards. These can be white foam boards, reflector discs, or even simple white poster boards. Position them strategically to bounce the light back onto the subject, filling in shadows and creating a more balanced and flattering lighting setup.

Adjust The Positioning & Angle Of Your Products: Experiment with moving your products closer or farther from the window and changing the angle at which they are placed to capture different lighting effects. Observe how the light falls on your subject and make adjustments accordingly to achieve the desired result.
Artificial Lighting:

Choose The Right Lighting Equipment: Invest in artificial lighting equipment such as studio lights, continuous lights, or strobes based on your budget and specific photography needs. Consider LED lights for their energy efficiency and versatility.
Position Your Lights: Place your lights at different angles to create the desired effect. Utilize a key light as the main light source that illuminates your subject, a fill light to reduce shadows, and a backlight for added depth and separation from the background. Adjust the intensity and distance of the lights to control the overall lighting.
Use Light Modifiers: Experiment with light modifiers such as softboxes, umbrellas, or diffusers to soften and control the artificial light. These tools help to diffuse and spread the light evenly over your products, reducing harsh shadows and creating a more pleasing lighting setup.
Consider Color Temperature Control: If you want consistent color reproduction, use light sources with adjustable color temperature or invest in color correction gels. This allows you to match the lighting to your specific requirements and ensure accurate color representation of your products.
Remember, whether you choose natural light or artificial lighting, take the time to experiment and adjust the setup to achieve the desired results. Each lighting option has its advantages, so consider your specific product, the desired mood, and the level of control you need over the lighting conditions when making your decision.
Stabilizing & Testing Your Camera
After setting up your product photography studio, the next steps involve stabilizing your camera and testing camera settings. Here’s how you can do it:
Stabilizing the Camera:

Use A Tripod: Place your camera on a sturdy tripod to ensure stability and reduce camera shake. This is crucial for obtaining sharp and clear product images, especially in low-light conditions or when using longer exposure times.
Mount The Camera Securely: Attach your camera securely to the tripod mount, ensuring it is level and properly aligned with your subject. Use any necessary mounting plates or screws provided with your tripod for a secure connection.
Adjust The Tripod Height & Position: Set the tripod height so that the camera is at the desired height and angle for capturing your products from the desired perspective. Take into account the size and positioning of your products on the tabletop while adjusting the tripod position.
Lock The Tripod Legs: Once you have positioned the tripod, make sure to lock the tripod legs in place to prevent any accidental movement during the photo shoot.
Testing Camera Settings:

Set The Camera To Manual Mode: Switch your camera to manual mode to have full control over exposure settings. This allows you to adjust the aperture, shutter speed, and ISO according to your specific product and lighting conditions.
Determine The Aperture: Depending on the desired depth of field, choose the appropriate aperture setting. A higher aperture (e.g., f/8 to f/16) provides greater depth of field, keeping more of your product in focus, while a lower aperture (e.g., f/2.8 to f/5.6) creates a shallow depth of field, putting emphasis on a specific area of the product.
Set The Shutter Speed: Adjust the shutter speed to an appropriate value that allows enough light to reach the camera’s sensor without introducing blur. Use a faster shutter speed for stationary subjects or a slower shutter speed for capturing motion, ensuring stability through the tripod.
Select ISO: Set the ISO sensitivity based on the available light and camera noise performance. Start with a low ISO (e.g., 100 or 200) to minimize noise, and gradually increase it only if necessary to maintain proper exposure.
White Balance: Set the white balance according to the lighting conditions. Use the camera’s preset white balance options or manually adjust it to ensure accurate color representation.
Enable Gridlines: Turn on the camera’s gridlines to help with composition and ensure your products are properly aligned within the frame.
Take Test Shots: Capture a series of test shots with various camera settings to evaluate the exposure, focus, and overall composition. Review each image on your camera’s display or transfer them to a computer for a better view.
Continue experimenting with different settings until you achieve the desired outcome and adjust as needed for each product or shoot.