Photoshop is a versatile tool that can be used for a wide range of image editing tasks, from basic retouching to complex compositing. One common request from users is to remove braces from a subject’s teeth in a photograph. Whether it’s for a personal portrait or a professional headshot, Photoshop can help you achieve this with precision and finesse. In this comprehensive guide, we will walk you through the step-by-step process of removing braces in Photoshop using Maacc Retouch techniques.
Process to Remove Braces in Photoshop
- Open Photoshop on your PC: Before we dive into the intricate process of removing braces, you need to have Adobe Photoshop installed on your computer. If you don’t already have it, you can subscribe to Adobe Creative Cloud and download the latest version of Photoshop.
- Select the Braces with the Pen Tool: Removing braces requires precision, and the Pen Tool is an excellent choice for creating precise selections. Here’s how to get started:
- Choose the Pen Tool from The Tool Bar: In Photoshop, select the Pen Tool from the tool sidebar on the left-hand side of your screen. The Pen Tool is represented by an icon that looks like a fountain pen nib.
- Zoom in for Precision: Zoom in on the area containing the braces to get a closer view. This will allow you to work with greater accuracy.
- Start Creating Path Around Braces: With the Pen Tool selected and zoomed in for precision, follow these steps to create a path around the braces.
- Follow the Contours of the Braces Accurately: Click at the starting point of the braces and start tracing along their contours. Click and drag to create curved segments when needed to match the shape of the braces.
Create a New Layer
Before proceeding further, it’s a good practice to create a new layer to isolate the braces from the rest of the image. This will allow you to work on the braces separately without affecting the original image.
Make a New Layer (Ctrl + J) to Isolate the Braces
- Name the New Layer: Name the new layer something descriptive, such as “Brace Removal.” This will help you stay organized as you work on the image.
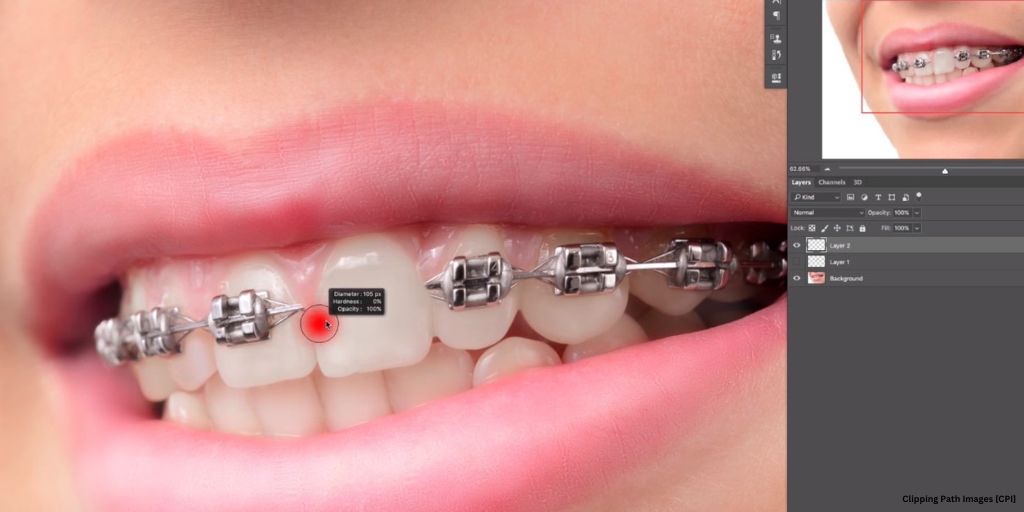
- Smooth the Brace Area: Zoom in for detailed editing and utilize the perfect tool to smooth the braces. You can use two primary tools for this purpose: the Clone Stamp Tool and the Healing Brush Tool.
Clone Stamp Tool
The Clone Stamp Tool allows you to sample an area of the image and clone it to cover another area. To use it, follow these steps:
- Select the Clone Stamp Tool from the Tool Bar.
- Adjust the brush size to match the width of the braces.
- Hold down the “Alt” key and click on an area of the teeth near the braces to sample.
- Release the “Alt” key and carefully paint over the braces to replace them with the sampled area.
Healing Brush Tool
The Healing Brush Tool is another excellent option for smoothing out the braces. It works by blending the sampled area with the surrounding pixels, making it look more natural. Here’s how to use it:
- Select the Healing Brush Tool from the Tool Bar.
- Adjust the brush size as needed.
- Hold down the “Alt” key and click on an area near the braces that you want to use as a reference.
- Release the “Alt” key and paint over the braces. The tool will automatically blend the sampled area with the surrounding teeth.
Adjust the Color and Tone
After smoothing the brace area, it’s essential to adjust the color and tone of the edited area to ensure it blends seamlessly with the rest of the teeth. This step is crucial for achieving a natural look.
To adjust the color and tone:
- Create a new adjustment layer, such as “Hue/Saturation” or “Curves.”
- Fine-tune the settings until the edited area matches the color and tone of the surrounding teeth.
Adjust the Color and Tone of the Edited Area with the Rest of the Teeth
Ensure Natural Blending with Surrounding Teeth
Carefully inspect the edited area to make sure it blends naturally with the surrounding teeth. Pay attention to details such as shading and highlights to achieve a convincing result.
Refine the Edited Image
Zoom out to evaluate the overall appearance of the edited image. Take note of any areas that may need further adjustments or refinements.
Zoom Out to Evaluate the Overall Appearance
If you notice any imperfections or areas that require further attention, use Photoshop’s various tools and adjustment layers to make the necessary adjustments. This may include additional color and tone corrections, as well as fine-tuning the shape of the braces.
Final Touches
Before completing the editing process, make sure the image looks natural and that the removal of braces is not obvious. Pay close attention to details, and don’t rush this step.
Merge the Edited Layer With the Original Background
Once you are satisfied with the edits, merge the edited layer (the one containing the retouched braces) with the original background layer. To do this:
- Select the edited layer.
- Right-click on it and choose “Merge Down” or “Flatten Image” to combine it with the background.
Apply Finishing Touches
Before saving the image, apply any final touches or adjustments to enhance the overall quality and appearance.
Save the Edited Image
When you’re ready to save the edited image, follow these steps:
- Go to “File” > “Save As.”
- Choose a suitable format for your edited image, such as JPEG or PNG.
- Select a destination folder and provide a name for the edited file.
- Click “Save.”
Save A PSD file For Future Edits
To preserve your work and allow for future edits, it’s a good practice to save a Photoshop (PSD) file of the edited image. This way, you can revisit the project and make changes as needed without starting from scratch.
Wrapping UP
Removing braces in Photoshop using the Maacc retouch technique is an effective way to enhance your photos and achieve a natural-looking smile. By carefully selecting and smoothing the braces,you can seamlessly remove them from the image and create a polished final result. Remember to pay attention to details, blend the edited area with the surrounding teeth, and make necessary adjustments to ensure a realistic outcome. With practice and patience, you can master the art of removing braces in Photoshop and transform your images into stunning portraits. So, give it a try and unlock the full potential of your dental photography skills!